Feedback
Open “Feedback” in the sidebar. “Responses” contains feedback, while “Campaigns” lets you create forms.
Viewing requires “View” permission in the “Feedback” row. Creating requires both “Create” and “Edit”: without either permission, you cannot create a campaign. Editing and changing status require “Edit”; deleting requires “Delete”. The account owner has all permissions.
Responses
Open “Responses” to view feedback and completed forms. The table shows the response text, source, status, and time received. Sources can be:
- “Page” or
iframe— feedback from previously created public updates pages; - “Popup survey” — responses to a form in a popup;
- “SDK widget” — a response from a feedback campaign.
The “Feedback status” filter includes “All”, “New”, “Read”, and “Archived”. Open a response to view it in full.
A popup response card shows the popup, form, user, submission time, and answers to questions. A campaign response shows the campaign, user, rating, email, text, and answers to questions. Feedback from a page includes an email, source, and an “Open” link to the page.
In the response card or row, you can:
- click “Mark as read” or “Mark as new”;
- click “Archive”;
- click “Delete”. Deleted records cannot be restored.
Campaigns
Before publishing, connect the widget to your website: create a public key and add the code from Public key and installation code. Without the installation, visitors will not see the campaign.
In “Feedback” → “Campaigns”, click “Create campaign”. Choose a type:
- “Rating” — a form with a rating, detailed feedback, and an optional email;
- “Written feedback” — a form for detailed feedback;
- “Survey” — a form with a question and answer options.
After creation, the editor opens with “Content”, “Design”, “Display”, and “Review” steps. “Live preview” is available on the right; switch between “Wide” and “Narrow” to check the form on different screens.
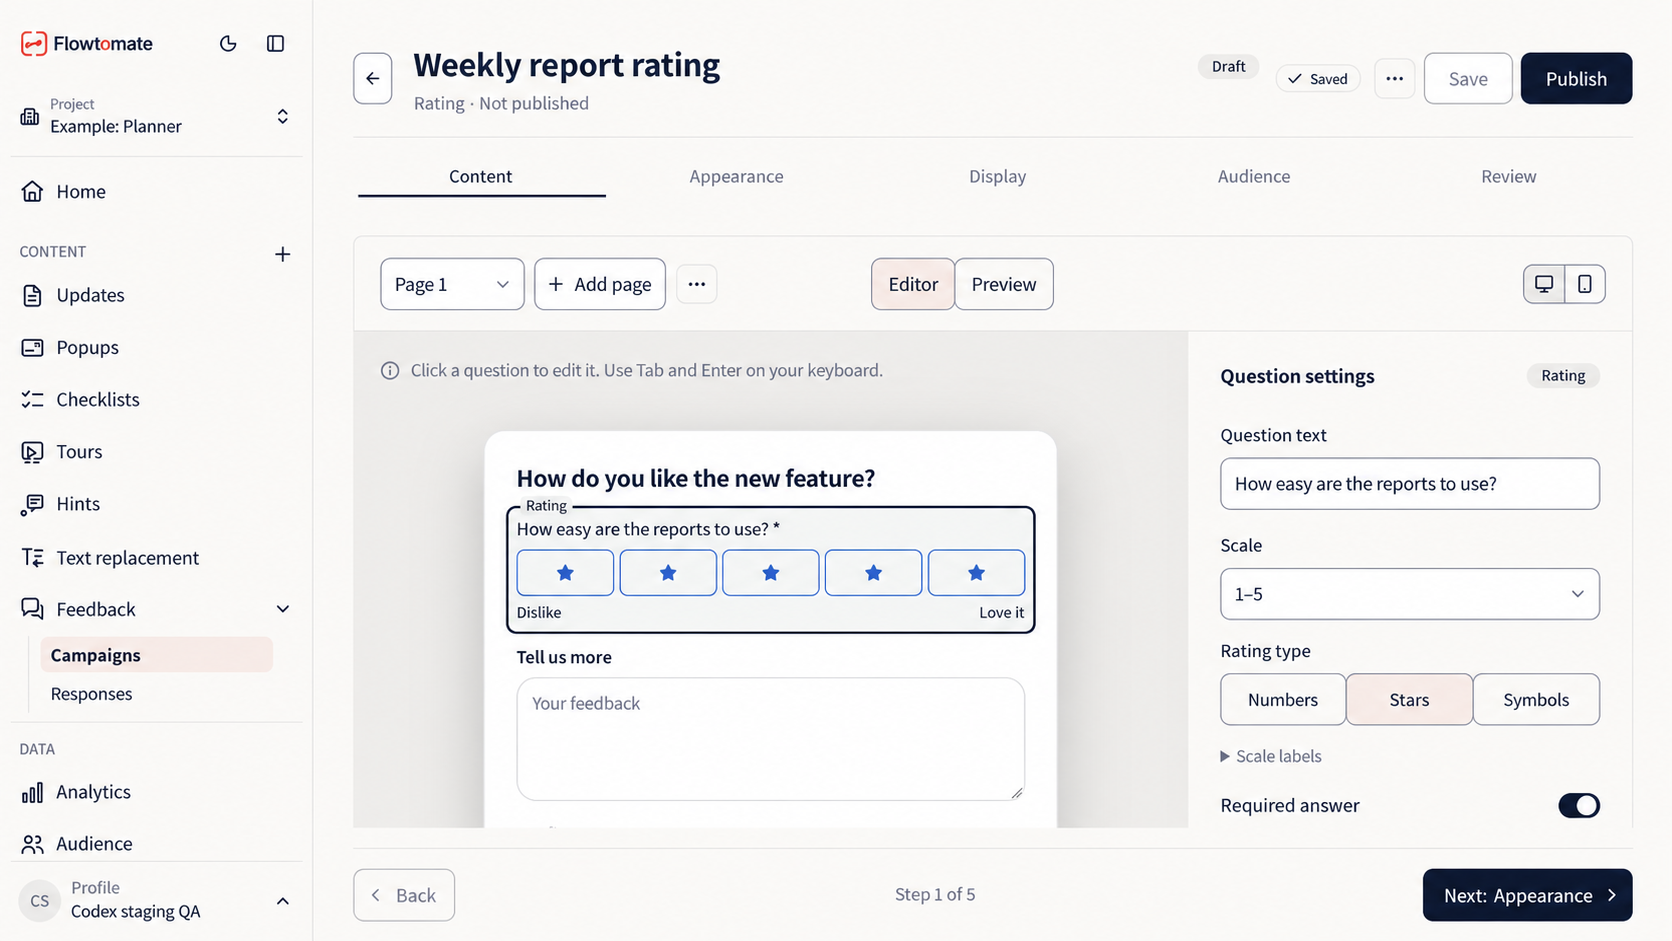
An example campaign with a 1–5 rating is saved as a draft. Visitors cannot see it yet.
Content
Enter an internal name in “Campaign name”; visitors will not see it. Set the “Page title”, “Description”, and questions for each page. A form can contain no more than 20 pages and 20 questions in total. Each page must contain at least one question.
Question types include “Short text”, “Long text”, “Email”, “Phone”, “Date”, “Choice”, and “Rating”. Enable “Required response” if a question cannot be skipped.
For “Rating”, choose a scale of 1–5 or 0–10 (NPS) and a style: numbers, stars, or symbols. For a “Choice” question, add answer options and enable “Allow multiple choices” if needed. Set the page's “Button text” and “Action”: “Submit responses”, “Open next page”, or “Open selected page”. The last page cannot lead to the next page.
To send results to another system, enable “Send data to an external system” and enter an “Endpoint”. It must be a public HTTPS URL. After saving a response, Flowtomate sends JSON there in a single POST request, without a signature or automatic retries. If delivery fails, the response stays in Flowtomate. Do not put secrets in the URL. Developers can refer to the request format and limitations.
Fill in “Message after submission”; visitors see it after successfully submitting the form.
Design
In “Design”, start with a preset: “Modern”, “Minimal”, “Warm”, or “High contrast”. Then adjust colors for the accent, window, fields, and text; the font and its size; and the form's width, corner rounding, density, and shadow.
You can also set field appearance and rounding, button appearance and width, and an optional logo URL. The logo needs a public HTTPS URL. “Restore project settings” removes the campaign's local design and reapplies the project design.
Display
In “Display format”, choose one of these options:
- “Card in corner”;
- “Centered modal”;
- “Side panel”;
- “Badge → compact modal”. Set “Badge text” for the badge.
For a card, modal, or side panel, choose “When to show”: “On page load” or “With a delay”. Enter the delay in seconds. A badge opens the form on click. The editor does not offer event selection for a new campaign: it can only preserve an existing “On event” trigger. A developer can call openFeedback to open it manually.
In “Repeat display”, set “Display frequency”: “Once”, “Once per session”, “Always”, or “After a pause”. For a pause, enter the number of days; in “Maximum displays”, enter a limit from 1 to 1000. The widget applies these rules after displaying the form. For example, “Once per session” prevents the same form version from appearing a second time in the current session, even if the visitor closed it without answering. Each newly published version has its own display history.
Review and lifecycle
At the “Review” step, Flowtomate shows the status of “Content”, “Design”, “Display”, and “Readiness”. Errors block publication; warnings do not. Click “Edit” to go to the field that needs attention.
Click “Save” to save a draft. Click “Publish” when the campaign is ready: it becomes “Active”, and its published version is available to visitors. After changing an active campaign, click “Publish” again to update the published version.
Click “Disable” in the campaign list to stop display. You can delete a campaign from the list or editor; deletion cannot be undone. Collected responses and the campaign name recorded in them are preserved.
If an error occurs
If responses do not load, check your connection and refresh the page. If a campaign cannot be created or opened, try “Create campaign” or “Open editor” again. If saving, disabling, or deleting fails, repeat the action after resolving the cause. Errors at the “Review” step block publication: click “Edit”, fix the field, and click “Publish” again.
Related articles
- Integration — connect the widget to display a campaign.
- Appearance — configure the form's shared style.
- Troubleshooting — if a campaign does not open or publish.